Complete Guide to Project Management in Nexus
Nexus is a powerful project management tool that supports multiple projects with structured workflows, permissions, and role-based access. This guide explains the different project types, creation, management, permissions, and customization options in Nexus.
Project Types in Nexus
Nexus supports two types of projects:
-
Team Projects
- Designed for collaboration with multiple users.
- Supports user and group management.
- Can only be created by Administrators and Application Managers.
- Suitable for team-based tasks, shared workflows, and cross-functional collaboration.
-
Personal Projects
- Created for a single user without any user management.
- Can be created by anyone.
- Only the owner and administrators have access.
- Best for individual task tracking and personal productivity.
Creating Projects in Nexus
Nexus allows you to manage multiple projects,projects whichsimultaneously. are categorized into two types:
Team Projects– Designed for multiple users, with user and group management. Only Administrators and Application ManagersYou can createthese.Personal Projects– Belong toasinglenewuserprojectandinhavethreeno user management. Anyone can create these.
1. Creating a Team Project (For Multiple Users)
For Multiple Users (Team Project):- Only Administrators and Managers can create
these.a team project. UserSupports user managementisandavailable.role assignment.- Steps to create a new team project:
- Navigate to the Dashboard.
- Click on "New Project"
from the dashboard.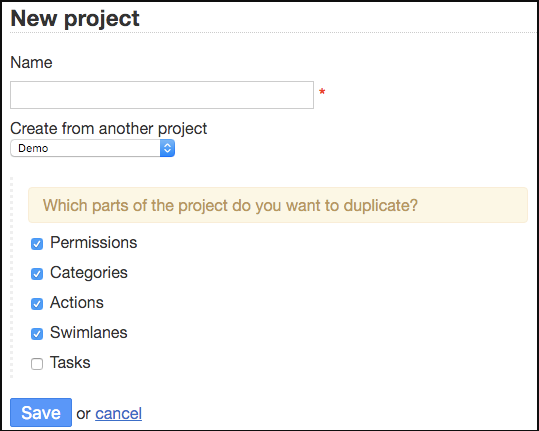
. - Enter a
projectProjectnameName. - Click
submit.Create.
and
- Only Administrators and Managers can create
- Creating
Fora PersonalUseProject (PersonalForProject):Individual Use) - Anyone can create
one.a personal project. - No user management
isoptions are available. - Only the project owner and administrators can access it.
- Steps to create a personal project:
- Go to the
project.Dashboard. - Click on "New Personal Project".
- Enter
theadashboard.Project Name. - Click Create.
from - Go to the
- Creating
a Project by Duplicating an Existing
Project:One When creating a new project, you can
copy an existing one, including:duplicate:- Permissions – Retains the same user roles.
- Actions – Keeps the same automated actions.
WorkflowSwimlanes – Preserves workflow lanes(Swimlanes)for organizing tasks.- Categories – Maintains task categorization.
- Tasks – Copies tasks from the original project.
To duplicate a project:
- Go to New Project.
- Select "Duplicate an Existing Project".

2.
3.
Nexus allows you to copy properties from an existing project to quickly set up a new one. This is useful when you want to create similar projects with the same structure.
Editing and Modifying Projects
Projects in Nexus can be modified at any time to reflect changing requirements.
Editing a Project
- Click on
“"EditProject”Project"to rename, update start/end dates, or modifyfrom thedescription.
project
settings. TheYoustartcanandmodify:end- Project
help generate a Gantt chart.Name - Start and End Dates (used in Gantt Charts)
- Project Description (visible as a tooltip on the board and project listing page)
dates- Project
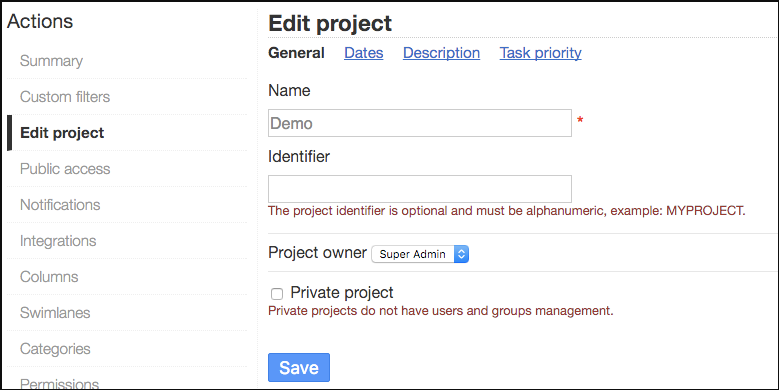
Converting Between Project Types:Types
- A Personal Project can be converted into a Team Project
andbyviceuncheckingversa.the “Personal Project” box. IfA Team Project can be converted into a Personal Project by checking the “Personal Project” box.- ⚠ Important: When converting
toa Team Project into a Personal Project,existingall previously assigned users will still have accessunlessuntil manually removed.
Deleting a Project
- Only
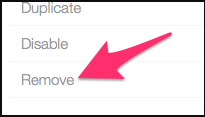
AdministratorsProject Managers orProject ManagersAdministrators can delete a project. Go to"Project Settings" > "Remove"to delete a project.
- Deleting a project will permanently
removesremove alltasksassociatedwithtasks. - To delete a project:
- Open Project Settings.
- Click “Remove” at the bottom of the menu.
- Confirm deletion.
Managing Project Permissions
Each project isin separate,Nexus andoperates accessindependently. Users must be explicitly granted explicitly.
- to
Rolesworkinon aProject:project.Available Project Roles
- Project Manager –
FullHascontrol.full control over the project, including task management, user roles, and settings. - Project Member – Can
contributecreate and modify tasks but with some restrictions. - Project Viewer –
Read-Has read-onlyaccess.access to the project.
- Project Manager –
OnlyAdministrators haveunrestrictedfull access to all projects.- Personal Projects do not have permission settings,
sinceas they areprivateaccessible only to theowner.owner and administrators. How to Set Up a Custom Role:permissions:- Go to Project Settings > Permissions.
- Assign a role to each user or group.
Custom Roles
>&AddRestrictionsWhat Are Custom Roles?
Custom roles in Nexus allow project managers to apply specific restrictions to users based on workflow needs. These roles inherit permissions from the Project Member role and can have additional limitations.
Common Use Cases for Custom Roles
- Restrict users from creating new tasks.
- Allow users to move tasks only between certain columns (e.g., "To Do" → "In Progress").
- Prevent users from closing or opening tasks.
Setting Up a Custom Role
-
Create a New Custom Role
Name the role and define restrictions:RestrictNavigatetasktocreationProject Settings > Custom Roles.RestrictClickmoving"AddoraclosingNewtasksCustom Role".LimitEnteractionsatoRolespecificNameworkflowandcolumnssave.
-
Define Restrictions
- You can restrict:
- Task creation (Allow or deny in specific columns).
- Task movement (Allow movement only between specific columns).
- Task status changes (Allow status changes only in designated areas).
- Click "Add a New Restriction" to configure settings.
- You can restrict:
-
Assign the
roleRole- Go to
users underProject Settings > Permissions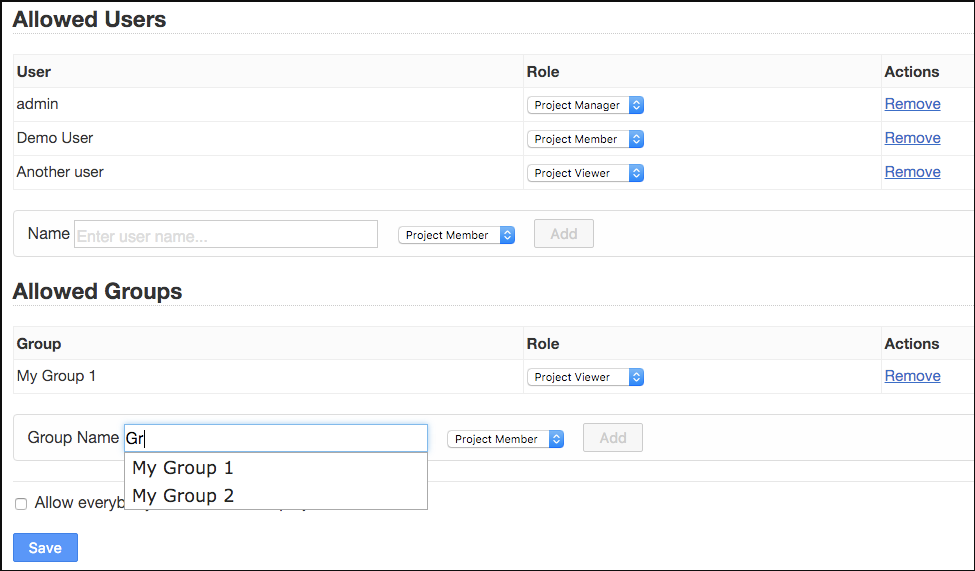
- Go to
- Assign
ExamplestheofcustomCustomroleRoletoRestrictions:Allow task creation only in specific columns (e.g., "Backlog")Restrict users from changing task status in certain columnsAllow moving tasks only between defined workflow steps (e.g., "Ready" → "Work in Progress")users.
- Public projects cannot be modified but can be shared via a secure URL.
- Useful for external stakeholders or displaying a project on a screen.
- Public boards refresh every 60 seconds to show the latest updates.
- Open
theProjectproject.Settings. - Click
“"PublicAccess”Access"and enable it.. AClickunique"EnablelinkPublicwillAccess".- Share
generatedtheforPublicviewing.Board URL. - enabled,
PublicNexusaccess includes:generates:- A Read-
onlyOnlyprojectProjectboardBoard Link - An RSS
feedFeedforSubscriptionupdatesLink - An iCalendar
linkSubscriptionfor schedulingLink
- A Read-
-
To disable public access:
Simply- Toggle
it"Disableoff.PublicAAccess" anytime. - Disabling public access generates a new
access link will be generated,URL, making previous links invalid.
toggleUsing Custom Filters
Custom filters help you save
frequentlyandusedreuse search queries,formakingquickitaccess.Howeasier tocreatemanage tasks across projects.Creating a
customCustomfilter:FilterGo toOpen Project Settings > Custom Filters.Create and saveEnter a searchqueryquery.If you're a Project Manager, you can shareSave thefilter with team membersfilter.
- Project Managers can choose to share filters with other team members.
- Once created, filters appear in the board view, next to default filters.
Oncesaved,yourNexus provides a structured yet flexible approach to project management. Whether managing a team project or working on personal tasks, Nexus allows you to:✅ Create and organize projects efficiently
✅ Assign roles and permissions to users
✅ Define customfilterrestrictionsappearsforalongsidecontrolleddefaultworkflows
✅ Share project boards securely with public access
✅ Use custom filters foreasybetteraccess.task managementThisWithguidethesesimplifiesfeatures, Nexus ensures that your projectcreation,runsmanagement,smoothly while maintaining security, transparency, andpermissions in Nexus, making it easy to navigate whether you're a beginner or an experienced user.flexibility.
- Toggle
CustomAssigning Roles & Restrictions
CustomTo rolesmanage helpproject set specific restrictions on users. For example, you can allow certain users to move tasks only between specific columns.

Sharing Projects & Tasks
Enabling Public Access
By default, all projectNexus boardsprojects are private.private. However, you can enable Public Access for read-only viewing.
To enable public access:
When